
Monday, 20 December 2010
Saturday, 18 December 2010
Flip
Flip Test 2 from Jonathan Finch on Vimeo.
For this video I was trying to create the effect of the word 'Flip' being flipped by a tiddlywinks counter. Im fairly pleased with the result but I think I could sharpen it up on a second attempt and make the flips look more realistic.
Wednesday, 15 December 2010
Studio Development


During a studio development session with Lorraine we looked at how the frame of a video consists of title safe and action safe areas and designed an animated sequence over 25 separate frames with this in mind. From these frames, we then picked out which would effectively be the key frames in a video sequence and also considered what methods of transformation we would need to use to implement the effects we wanted.
Tuesday, 14 December 2010
After Effects Workshop 3

Anchor Point is not in the centre of the text but it can be altered through 'Transform > Anchor Point' or through the 'Pan Behind' tool as shown below.
Additional properties are available with a text layer. Path Options and More Options.

Source Text allows you to introduce Key Frames to manipulate the text, EG Add more to the sentence or have the type change colour.

Adding to the sentence -

Changing colour -

Animate, found next to Source Text has further options:


Animating the text through 'Position' function on the Animate drop down menu.

Opacity

Key Steps to remember:
- Add Animator change
- Change property value
- Use Range Selector to animate the change
* Using either Start and/or End Keys are important when determining how you want the change to occur.
This is getting confusing now!
Layer Masks :

Wednesday, 8 December 2010
Silent Move : Idea frame sequences
Quick frame sequences based on the 3 given words : Flip, Extend, Zoom.
5 frames per idea to communicate the 5 second time frame we are working within.

Zoom


Extend
Tuesday, 7 December 2010
After Effects Practice Video 2
Enter from Jonathan Finch on Vimeo.
Breakthrough in After Effects!!
Key frames, Interpolation, Tweening...its all starting to make sense...well...kind of
After Effects Workshop 2
Creating assets in Photoshop to place into After Effects
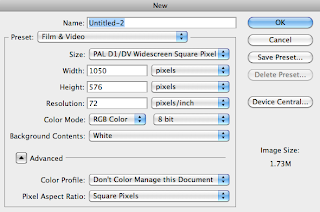 Select Film & Video preset and PAL D1/DV Widescreen Square Pixel (as in After Effects)
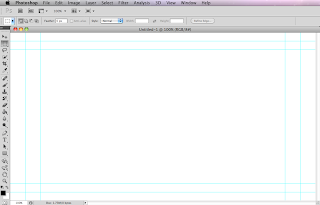 Title Safe Frame (Inner Rectangle)
Action Safe Frame (Middle Rectangle)

Each character created individually so that they could be animated individually later in After Effects.

This is how the document looks in Illustrator.

Importing from Photoshop into After Effects.
FILE > IMPORT > IMPORT AS > COMPOSITION/FOOTAGE
Depends on how you want to use it:
Footage - flattens file
Composition - retains layers
Composition Retain Layer Sizes - Eg. Different anchor points, letter rates around its own anchor point rather than the whole word's anchor point

Document imported into After Effects.
Any Photoshop artwork should be imported at the largest size you will need it, therefore you will only be making it smaller and subsequently it won't become pixelated.
ANIMATION > KEYFRAME INTERPOLATION:
- Linear
- Bezier
- Continuous Bezier
- Auto Bezier
- Hold
ANIMATION > KEYFRAME ASSISTANT:
- Constant Speed
- Ease In
- Ease Out
- Hold
FILE > COLLECT FILES:
Puts all documents used in the making of the video together in one folder.
Rendering:
COMPOSITION > ADD TO RENDER QUEUE
RENDER SETTINGS > TIME SPAN > LENGTH OF COMP
OUTPUT MODULE > LOSSLESS > FORMAT > QUICKTIME
FORMAT > VIDEO CODEC > H.264 (OK)
OUTPUT TO > NAME IT & SAVE IT (RENDER)
Monday, 6 December 2010

Wednesday, 1 December 2010
Subscribe to:
Posts (Atom)